| Vocademy |
Zener Diodes
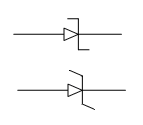
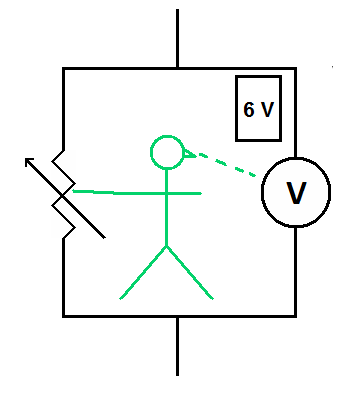
Think of a zener diode as a smart device that changes its resistance so that the voltage across it remains unchanged. When forward biased, a zener diode acts like a normal diode. However, when a zener diode is reverse biased it acts like a smart resistor. The following is the LGM model of a zener diode, where a little green man (LGM) monitors the voltage across the diode. He changes the resistance to whatever it takes to keep that voltage from changing.
|
The LGM Model of a Zener Diode
This is a 6 volt zener diode. The little green man's instructions (posted on the wall) are to watch the volt meter and change the variable resistor to whatever it takes to keep the voltage at 6 volts. Notice that the little green man watches the volt meter but doesn't watch the variable resistor. He changes the resistance until the voltmeter reads 6 volts. He doesn't care what that resistance is. |
Now let's set up a zener diode circuit. There must be a current limiting resistor in series with the diode. Let's say you place 10 volts directly across a 6 volt zener diode. The diode resistance will drop to its lowest possible value as the diode tries to bring the voltage down to 6 volts. The full 10 volts going through this very low resistance will result in a high current that will instantly burn up the diode. With a suitable resistor in series with the diode, the little green man can adjust the variable resistor to a value that will hold the voltage at 6 volts, without allowing too much current to flow through diode. We'll see how to choose this resistor later.
|
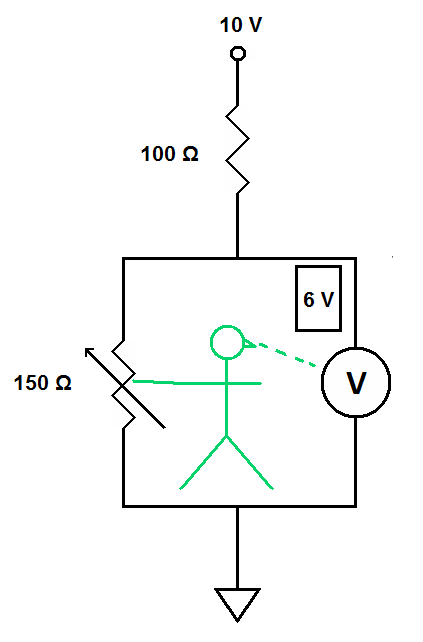
The LGM Model of a Zener Diode in Action
Here there is a 100 ohm resistor in series with the zener diode. When 10 volts is placed across the circuit the little green man cranks the variable resistor until he sees the meter reading 6 volts. This happens when the variable resistor is set at 150 ohms. |
Recall the series circuit rules. The voltages across the resistors must add up to 10 volts. The voltage across this zener diode must be 6 volts; that's what zener diodes do. That leaves 4 volts across the current limiting resistor. The zener diode has 50% more voltage than the current limiting resistor, so it must have 50% more resistance, which is 150 ohms.
Now let's increase the applied voltage to 18 volts.
|
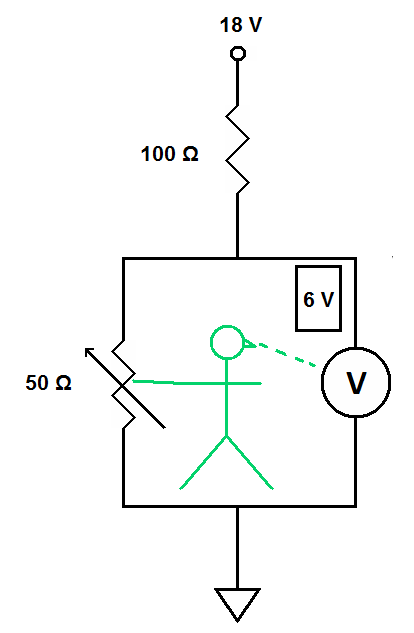
The LGM Model of a Zener Diode in Action
When the applied voltage increases to 18 volts the little green man has to crank the variable resistance down to 50 ohms. This keeps the voltage across the variable resistor at 6 volts. |
The voltages must now add up to 18 volts and the voltage across the zener diode must still be 6 volts. That leaves 12 volts across the current limiting resistor. To maintain these conditions the little green man cranks the variable resistor to 50 ohms.
Now let's look at a zener diode from another point of view. Notice that the zener diode is reverse biased in the demonstration. This is the normal operation of a zener diode. When forward biased, a zener diode acts no different from any other diode.
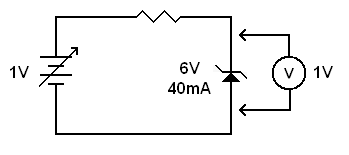
The rating of the above zener diode is 6 volts at 40 milliamps. To start with, lets apply a voltage that is below the zener diode voltage. The diode will increase its resistance to the maximum possible value as it tries to bring that voltage up to 6 volts. It can never get to 6 volts because the zener diode cannot give you more voltage than it gets from the source. As illustrated above, all it can get is the same 1 volt supplied by the battery. Like any other reverse-biased diode, the zener diode acts like an open circuit under this condition. There is no current flow and the voltage across the zener diode is equal to the source voltage. Another way to look at it is, the zener diode is an open circuit, so there is no current flowing in the circuit. There is no current flowing through the current limiting resistor, so there is no voltage drop across it. We start with 1 volt, lose no voltage across the series resistor and have 1 volt left across the zener diode.
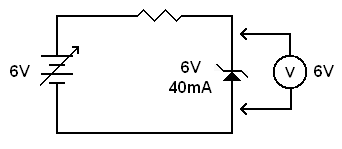
Now lets increase the applied voltage to match the zener diode voltage. The zener diode is now in a state where it is just about to start conducting. It is still acting like an open circuit and the voltage across the zener diode is still equal to the source voltage. However, it is at a threshold where it can compensate for any further increase in applied voltage by decreasing its resistance.
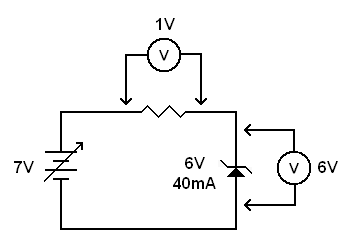
Here, the applied voltage is greater than the zener diode voltage. The zener diode lowers its resistance until the voltage across it is 6 volts. This being a series circuit, the voltage across the zener diode and the current limiting resistor must add up to the applied voltage. Therefore, we have 6 volts across the zener diode and 1 volt across the current limiting resistor adding up to 7 volts (this satisfies Kirchhoff's voltage law). If we increase the applied voltage the voltage across the zener diode will remain at 6 volts, but the voltage across the current limiting resistor will increase, making up the difference between the zener diode voltage and the applied voltage.
Zener diodes can be obtained with a wide range of voltage and current ratings. The zener voltage is specified at a certain current. In the above example the rating is 6 volts at 40 milliamps. A series resistor is selected to keep the nominal current near the rated current. Let's say the nominal applied voltage is 7 volts. This will put 1 volt across the current limiting resistor. To calculate the resistor we divide the current into this voltage. That's 1 volt divided by 0.04 amps giving us a resistor of 25 ohms.
Zener diodes are used where a stable voltage reference is required, such as in regulated power supplies. Another common use for zener diodes is voltage clamping (voltage limiting). For example, modern MOS devices often have built in zener diodes on the device gate. MOS devices are very sensitive to static electricity. If you touch the gate lead with a static charge on your body, the zener diodes will prevent the gate voltage from rising above the zener voltage. This is why modern MOS devices are much more robust than early devices.
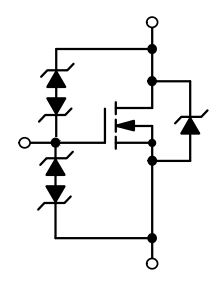
| A MOS transistor showing internal zener diodes. |
Today, proper antistatic measures are adequate to protects MOS devices, thanks to the built in zener diodes. In the early days, merely thinking about static electricity seemed to be enough to destroy MOS transistors. Zener diode clippers are used in many places where you need to limit the voltage as you connect from one circuit to another. Clipping is done either to protect the circuit (as in MOS devices), to remove unwanted noise (as in FM radio receivers), to remove unnecessary parts of a signal, etc.
Reality check
In the real world zener diodes aren't as perfect as shown above. If you increase the current through a zener diode the voltage across it will also increase, just as with any other component. However, with a zener diode, large changes in current result in tiny changes in voltage. As described above, a zener diode changes its impedance in response to current changes, but it does not compensate perfectly. To get the voltage as steady as possible, you need to keep current variations to a minimum.The test current specified for a zener diode is usually 1/2 to 1/4 of the maximum current. Even so, zener diodes will tend to get warm when run at the test current. As such, air currents blowing across the diode can cool it enough that the voltage will drop significantly. Random air currents can cause the voltage to go all over the place. I usually run zener diodes at 1/2 to 1/4 of the test current. This greatly reduces this heating and cooling effect. The voltage will be lower than at the test current, but the diode will not heat up enough to cause problems. Be careful not to let the current drop below the zener threshold current. Below this current the voltage will drop well below the specified voltage and will be extremely sensitive to current changes. The zener threshold current is not specified in datasheets. You may have to find your optimal current by trial and error.
Zener Diodes
| Vocademy |